Omnichannel Workflow Module
The Omnichannel Workflow Module helps teams build customer journeys that respond to events, branch on conditions, and send messages or audience updates through supported channels. Use it when a customer action should trigger a coordinated follow-up across email, SMS, WhatsApp, push notification, web notification, or Meta Ads.
Before you start
Confirm these items before building a workflow:
- A clear journey goal and success metric.
- A valid App stream for the workflow.
- Event data that can trigger or branch the journey.
- Templates for Email, SMS, WhatsApp, Web Notification, or Push Notification nodes when those channels are used.
- Meta Ads account and audience access when using Meta Ads nodes.
- Consent, suppression, and channel eligibility rules for the audience.
- A reviewer who can confirm customer experience, measurement, and activation readiness.
Workflow pages
The workflow module has three main pages.
| Page | Use it for | Main actions |
|---|---|---|
| Workflows | Find, create, monitor, and manage workflows | Search, create, view, edit, clone, delete, change status, customize list metrics |
| Workflow view | Review a workflow before final submission | Edit Workflow, Delete, Final Submit |
| Workflow editor | Build and configure the workflow diagram | Add nodes, configure nodes, connect branches, save changes, Activate Workflow |
When to use an omnichannel workflow
Use a workflow when the journey depends on customer behavior, event timing, or channel response.
Common examples include:
- Send an onboarding email after a signup event, then branch based on engagement.
- Send SMS or WhatsApp follow-up when a high-intent event occurs.
- Add a customer to a Meta Ads audience after they reach a journey milestone.
- Send a push notification or web notification after a saved trigger event.
- Exit a workflow when a customer completes the target event.
Manage workflows
Open Workflows to manage existing workflows.
From the workflow list, you can:
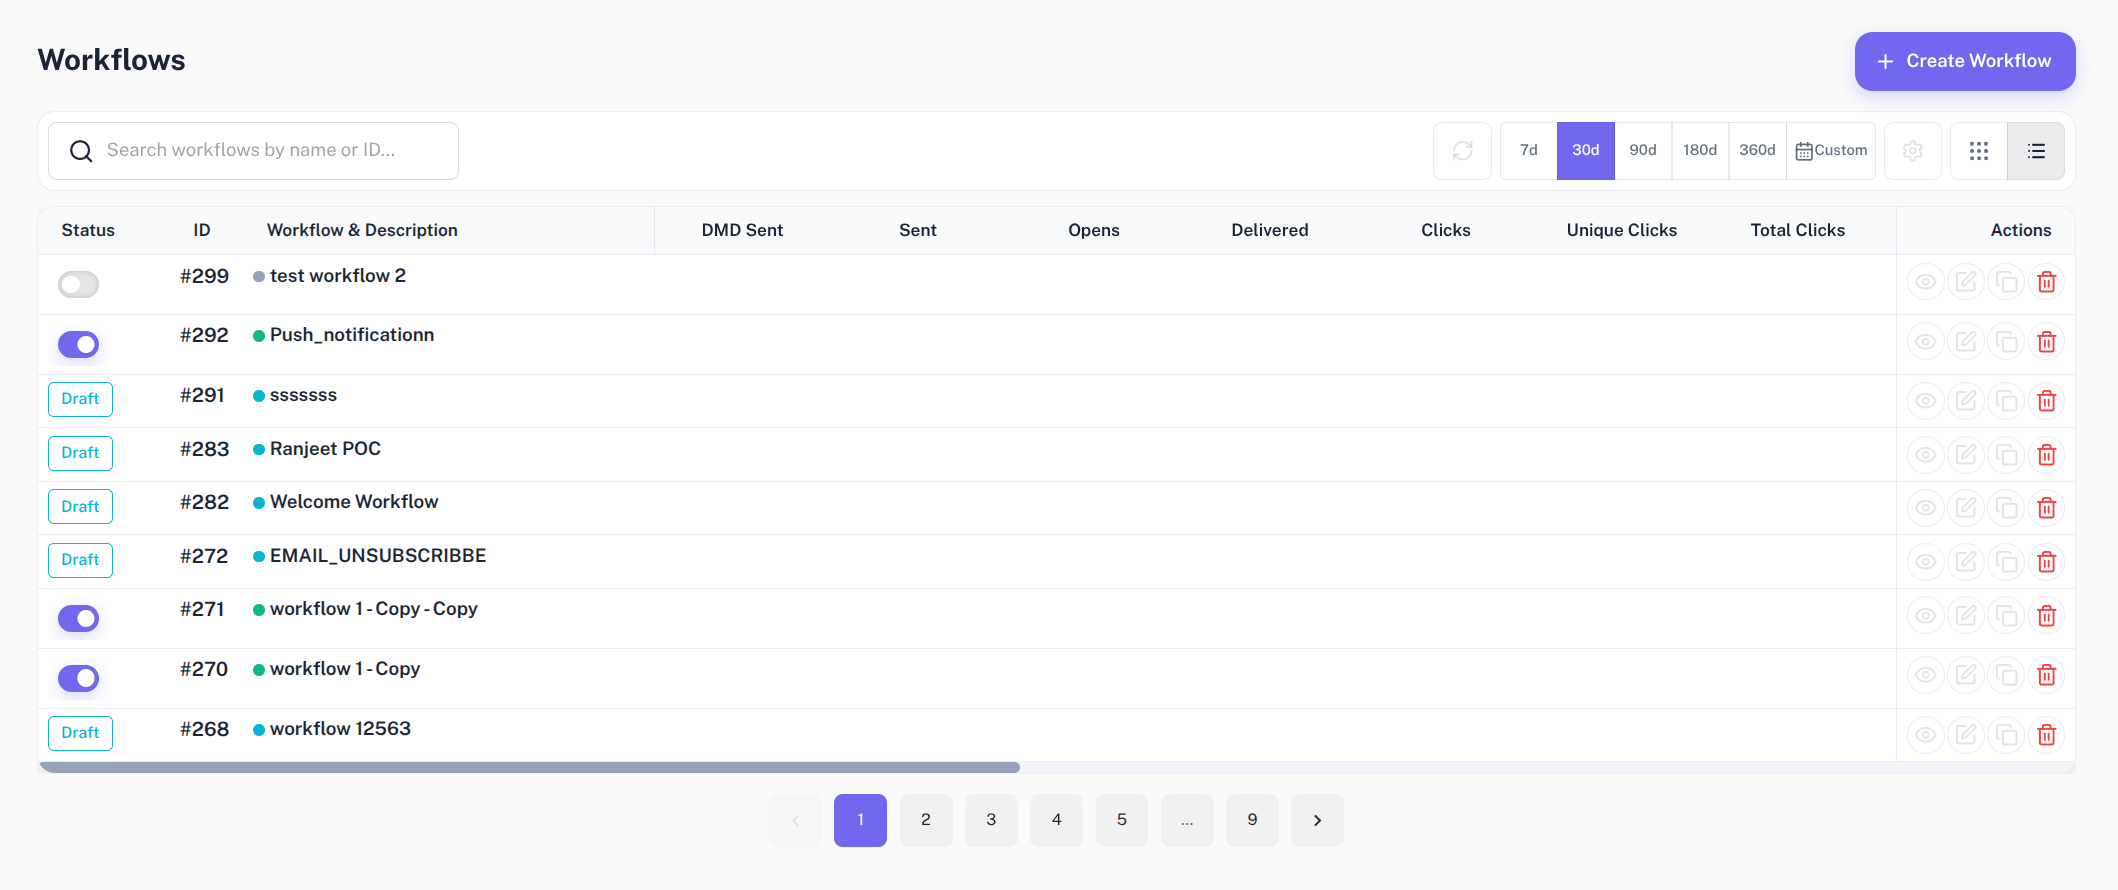
- Search workflows by name or ID.
- Switch between grid and list view.
- Create a workflow.
- View a workflow.
- Edit a workflow.
- Clone a workflow.
- Delete a workflow.
- Change Active or Inactive status for workflows that are not in Draft status.
Search uses the workflow name or workflow ID. Wait briefly after typing because search is debounced before results refresh.
Grid view is useful for quick workflow review. List view is useful when you need analytics columns, date ranges, refresh, and column customization.
Customize list metrics
In list view, use Customize Columns to choose static workflow columns and analytics measures.
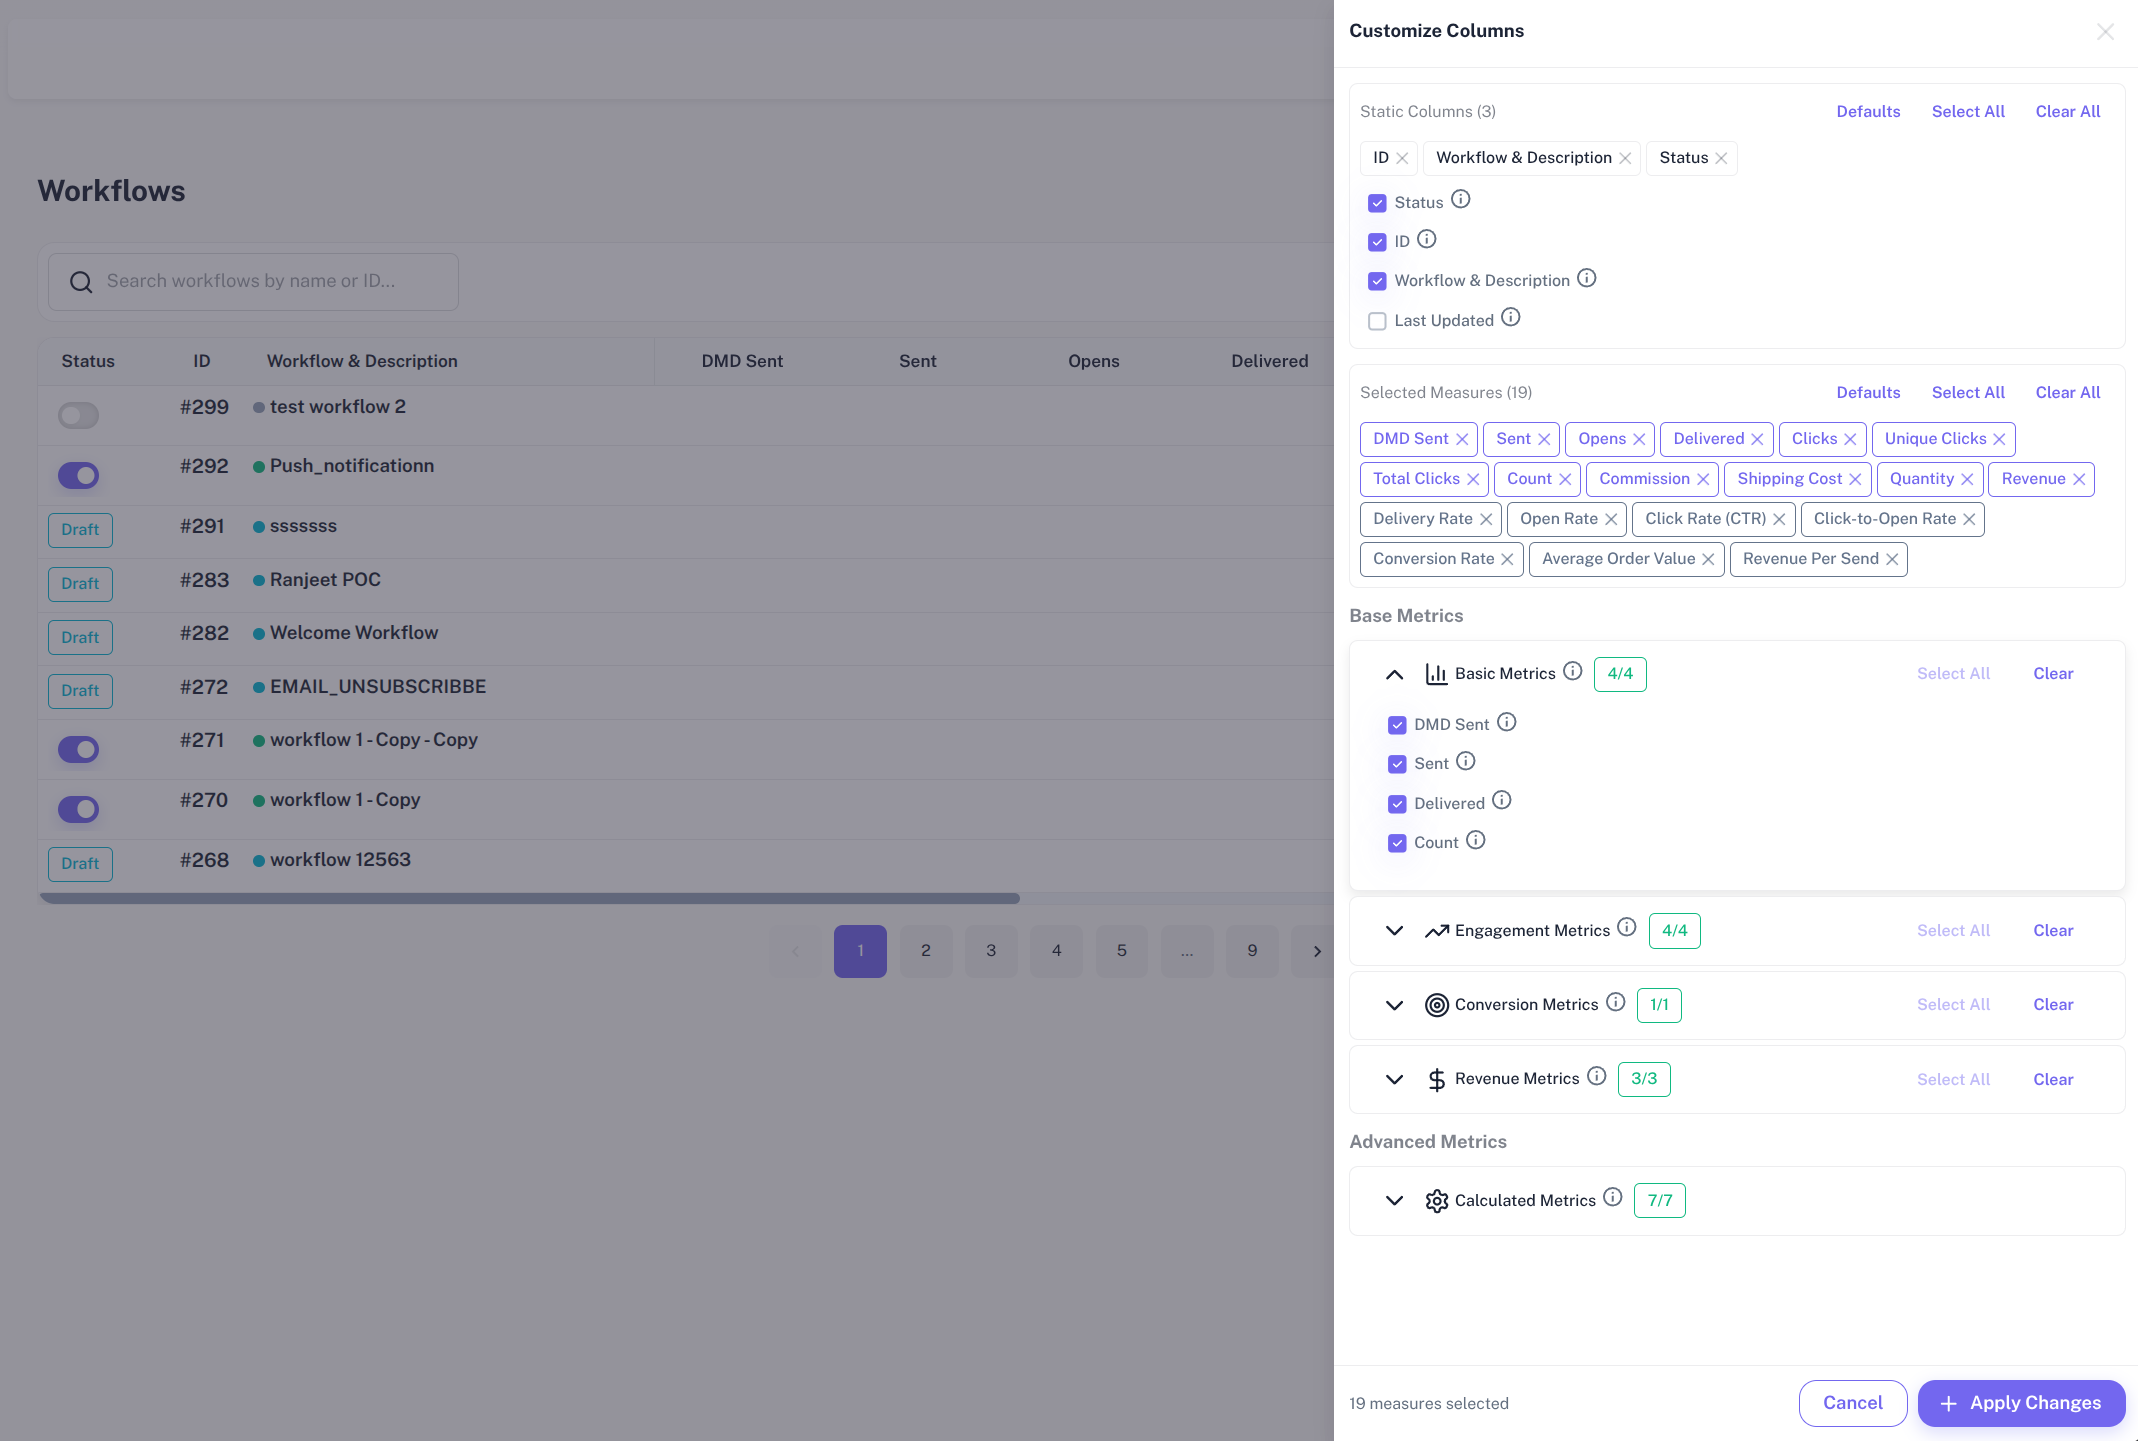
Static columns include:
- Status.
- ID.
- Workflow & Description.
- Last Updated.
Default analytics measures include Sent, Opens, and Clicks. Other available measures can include delivery, engagement, conversion, and revenue measures depending on workspace data and selected column settings.
Use the date range selector to review workflow metrics for common ranges such as the last 7, 30, 90, 180, or 360 days. Use Refresh Analytics or Retry Analytics when the list warns that analytics data is unavailable.
Create a workflow
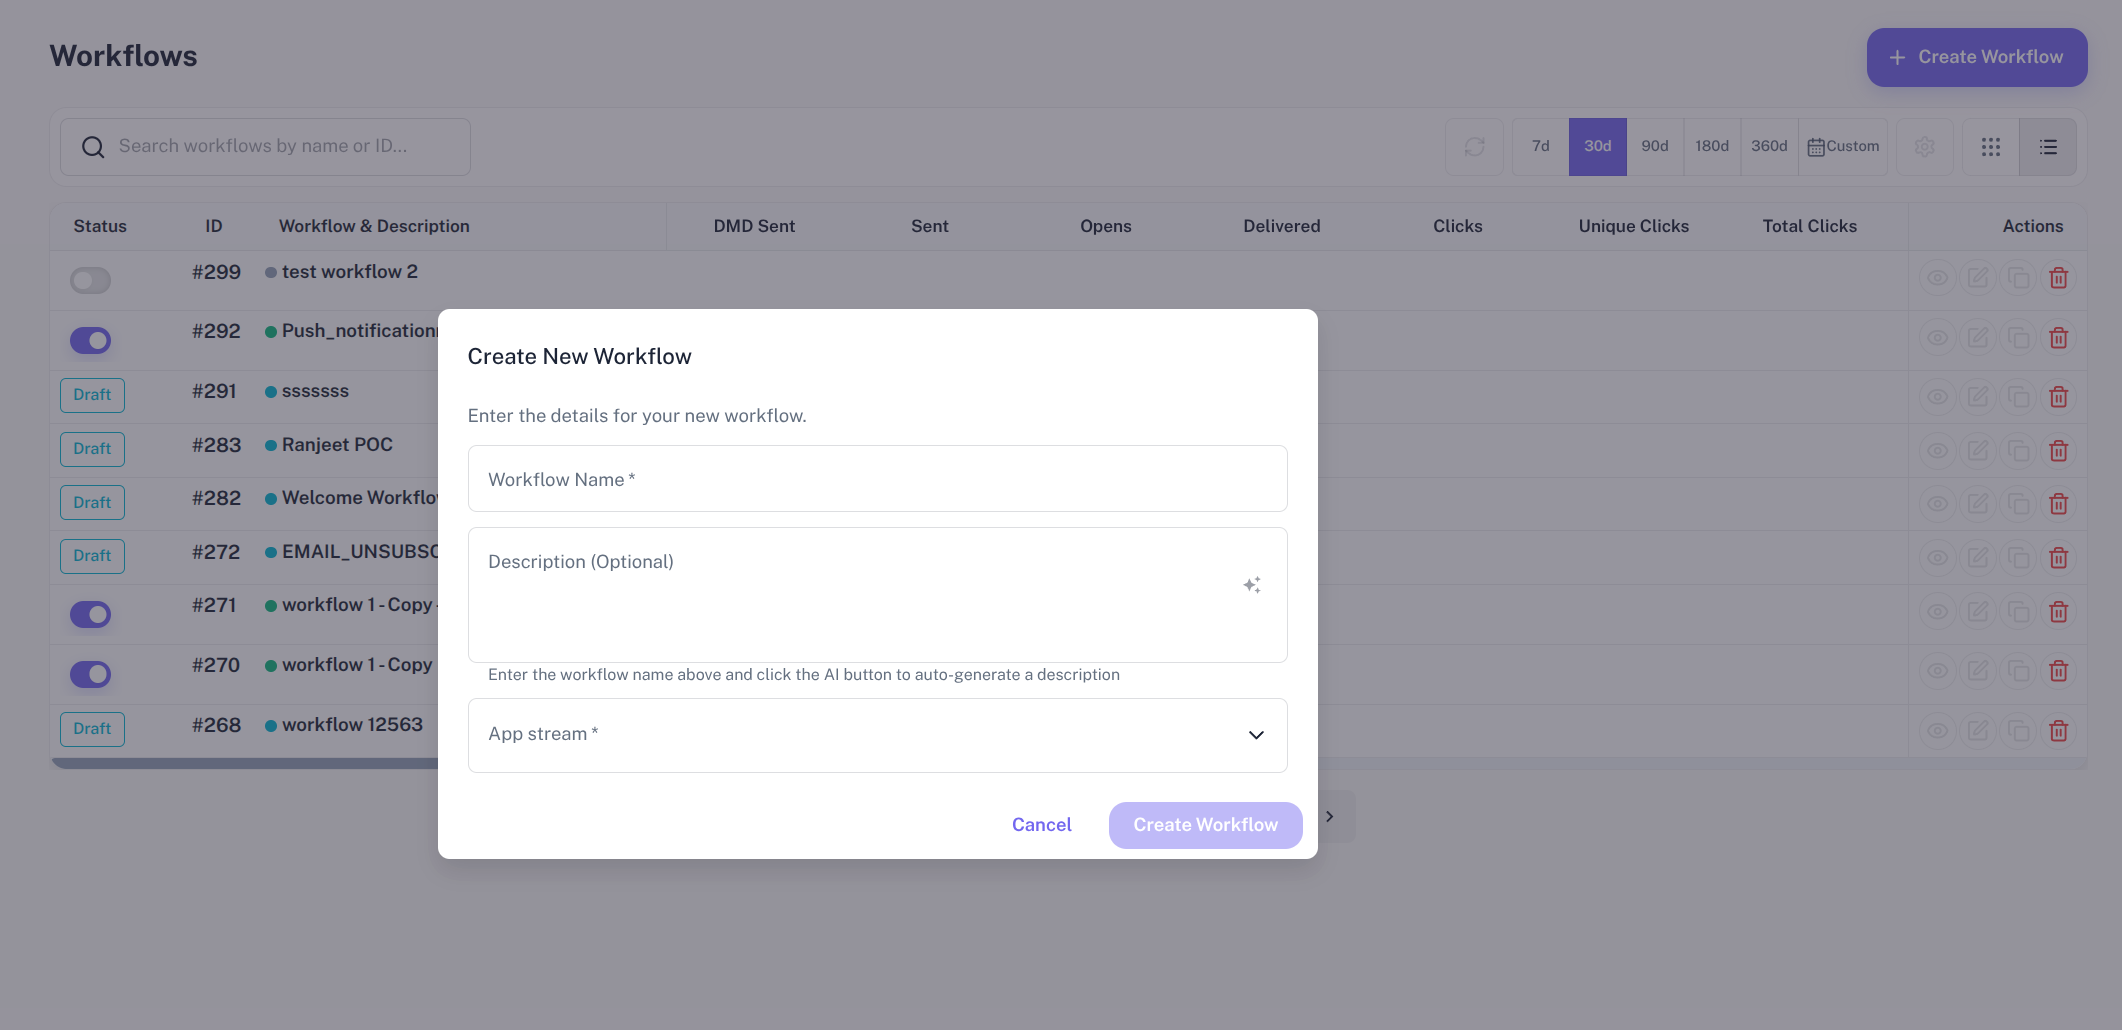
- Open Workflows.
- Select Create Workflow.
- Enter Workflow Name.
- Add Description (Optional) if the workflow purpose needs more context.
- Select an App stream.
- Select Create Workflow.
After the workflow is created, DriveMetaData opens the workflow editor.
Use workflow names that include the journey goal, audience, and channel. Example: Onboarding - Trial Signup - Email SMS.
Edit workflow details
In the workflow editor, select the pencil icon next to the workflow name to open Edit Workflow.
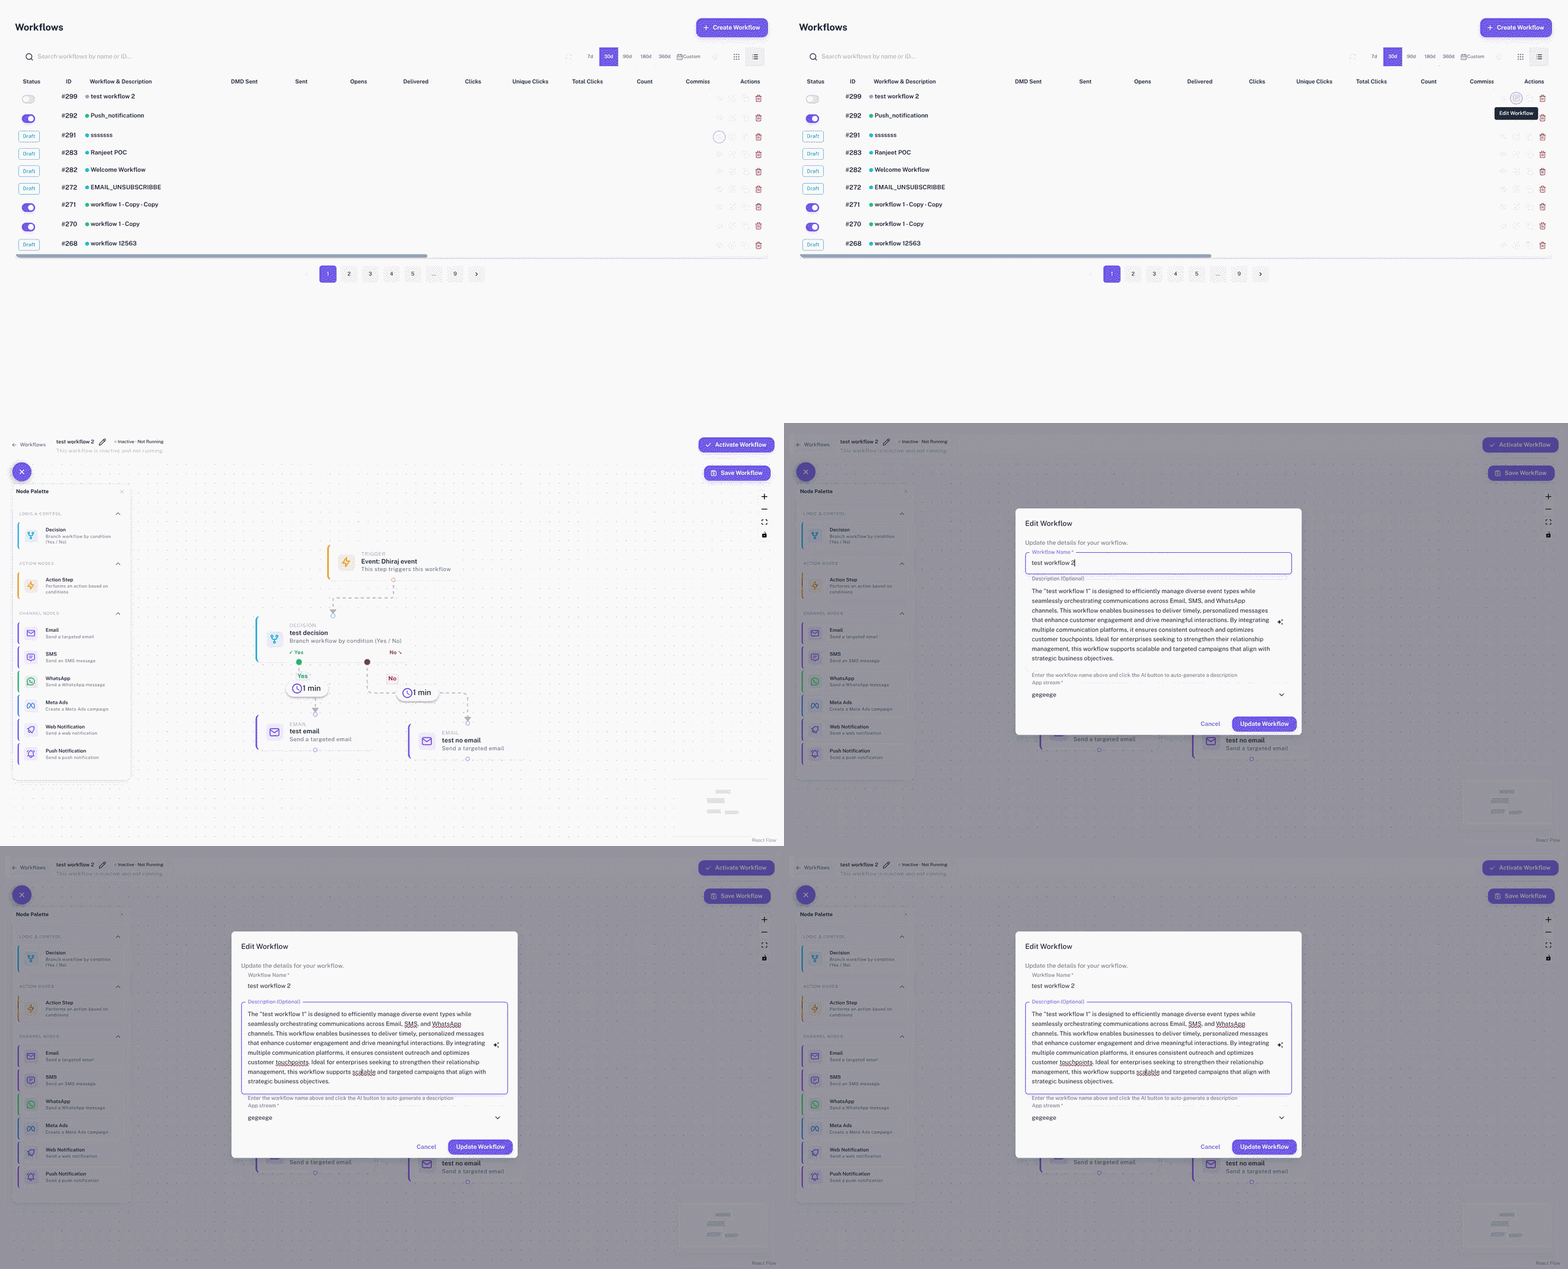
Use this dialog to update:
- Workflow Name.
- Description (Optional).
- App stream.
The name and App stream are required. The description can be generated with Generate AI Description after a workflow name is entered.
Use the workflow editor
The workflow editor includes a canvas, a Node Palette, workflow save controls, and an activation action.
New workflows start with an Event Type trigger node. This node represents the event that starts the workflow.
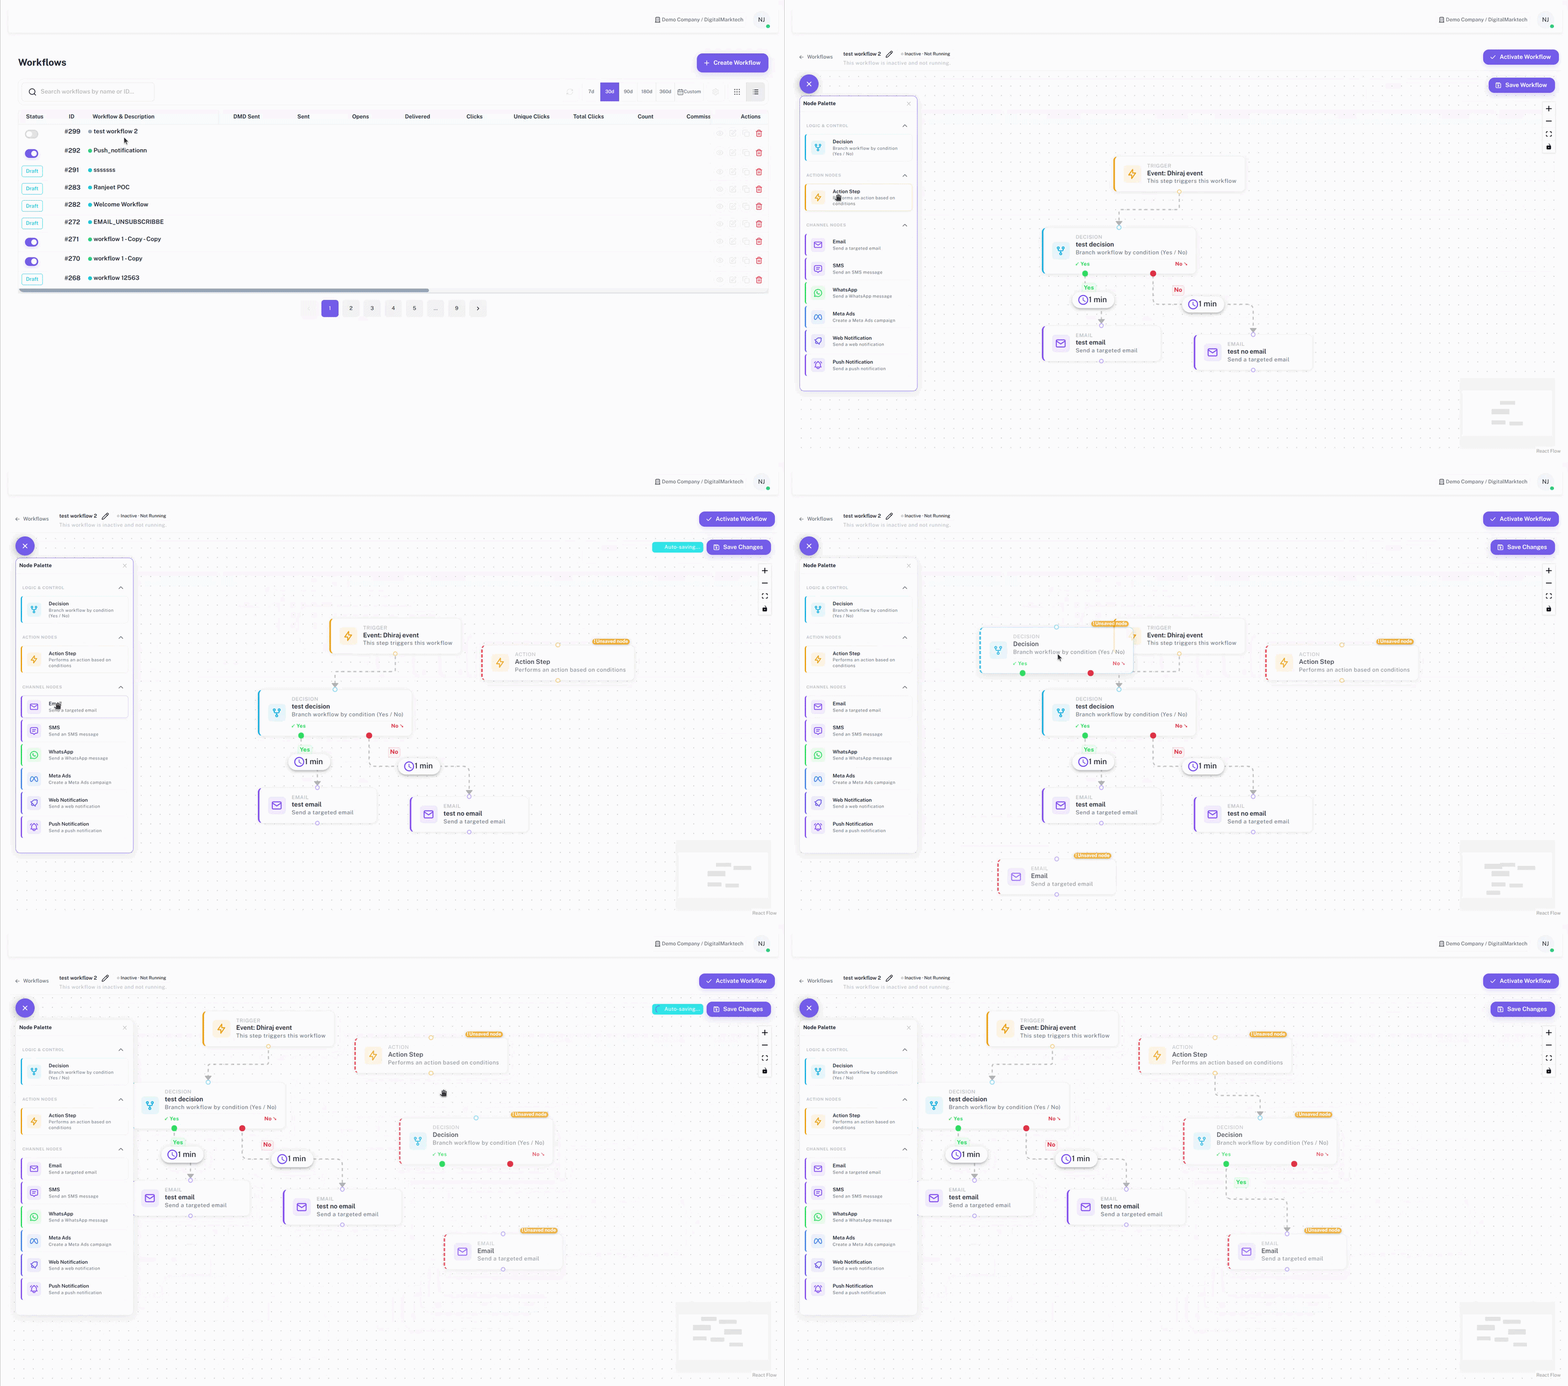
To build the journey:
- Select the plus button to open Node Palette if it is closed.
- Drag a node onto the canvas.
- Connect nodes in the order customers should move through the journey.
- Select a node to open its configuration drawer.
- Complete the required fields for the node.
- Select Create Node for a new node or Update Node for an existing node.
- Use Save Workflow or Save Changes to persist the diagram when needed.
The visible Node Palette supports these node types:
| Node | Use it for |
|---|---|
| Decision | Branch the workflow with Yes and No paths based on configured conditions |
| Action Step | Define an event-based action step and optional exit events |
| Send an email template after a delay or schedule | |
| SMS | Send an SMS template after a delay or schedule |
| Send a WhatsApp template after a delay or schedule | |
| Meta Ads | Use a Meta Ads account and audience as part of the journey |
| Web Notification | Send a web notification template after a delay or schedule |
| Push Notification | Send a push notification template after a delay or schedule |
Configure Action Step nodes
Use Action Step to define an event-based action in the journey.
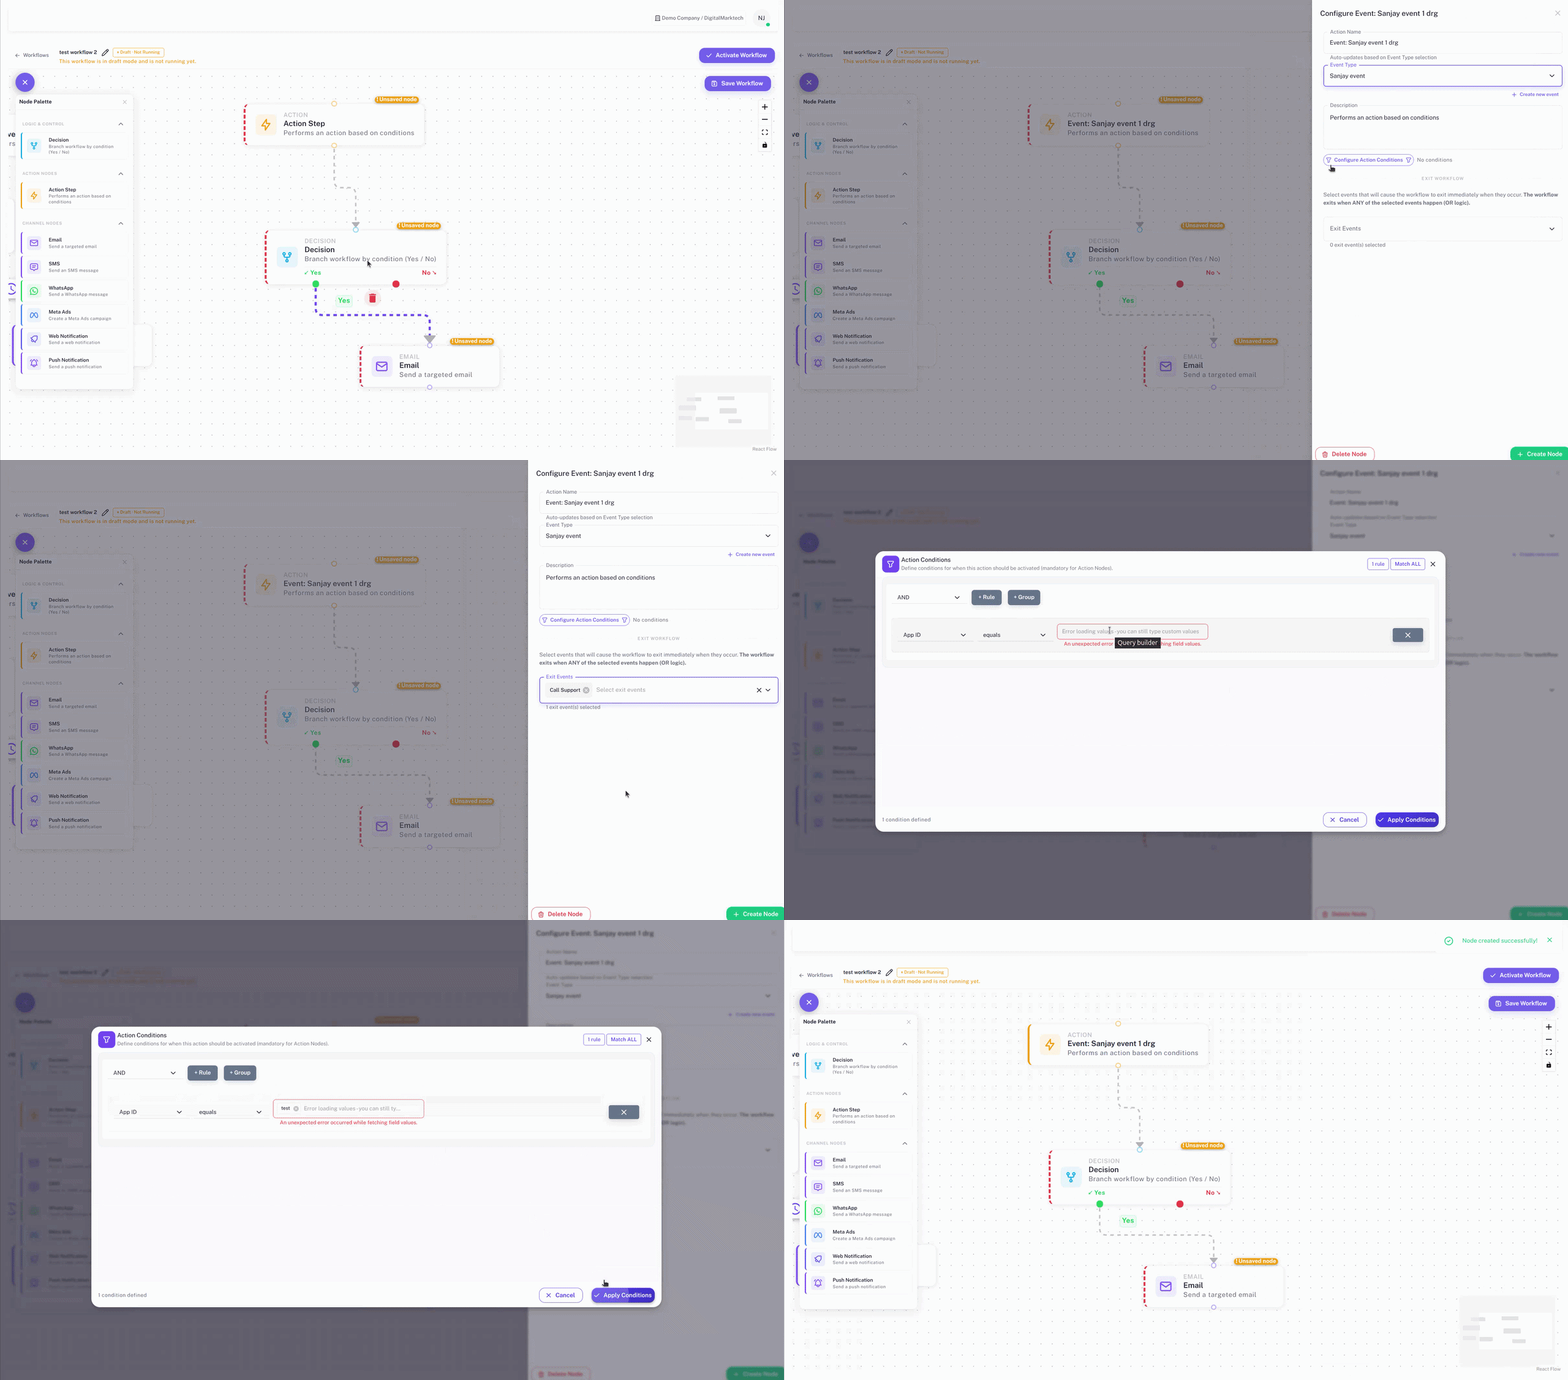
Configure:
- Action Name.
- Event Type.
- Description if needed.
- Condition Query when the action should only apply to a subset of customers.
- Exit Events when a customer should leave the workflow after a selected event occurs.
Selecting an Event Type can update the action name automatically. If the event you need is not available, use Create new event from the action configuration area.
Exit events use OR logic. The workflow exits when any selected exit event happens.
Configure Decision nodes
Use Decision to branch the journey.
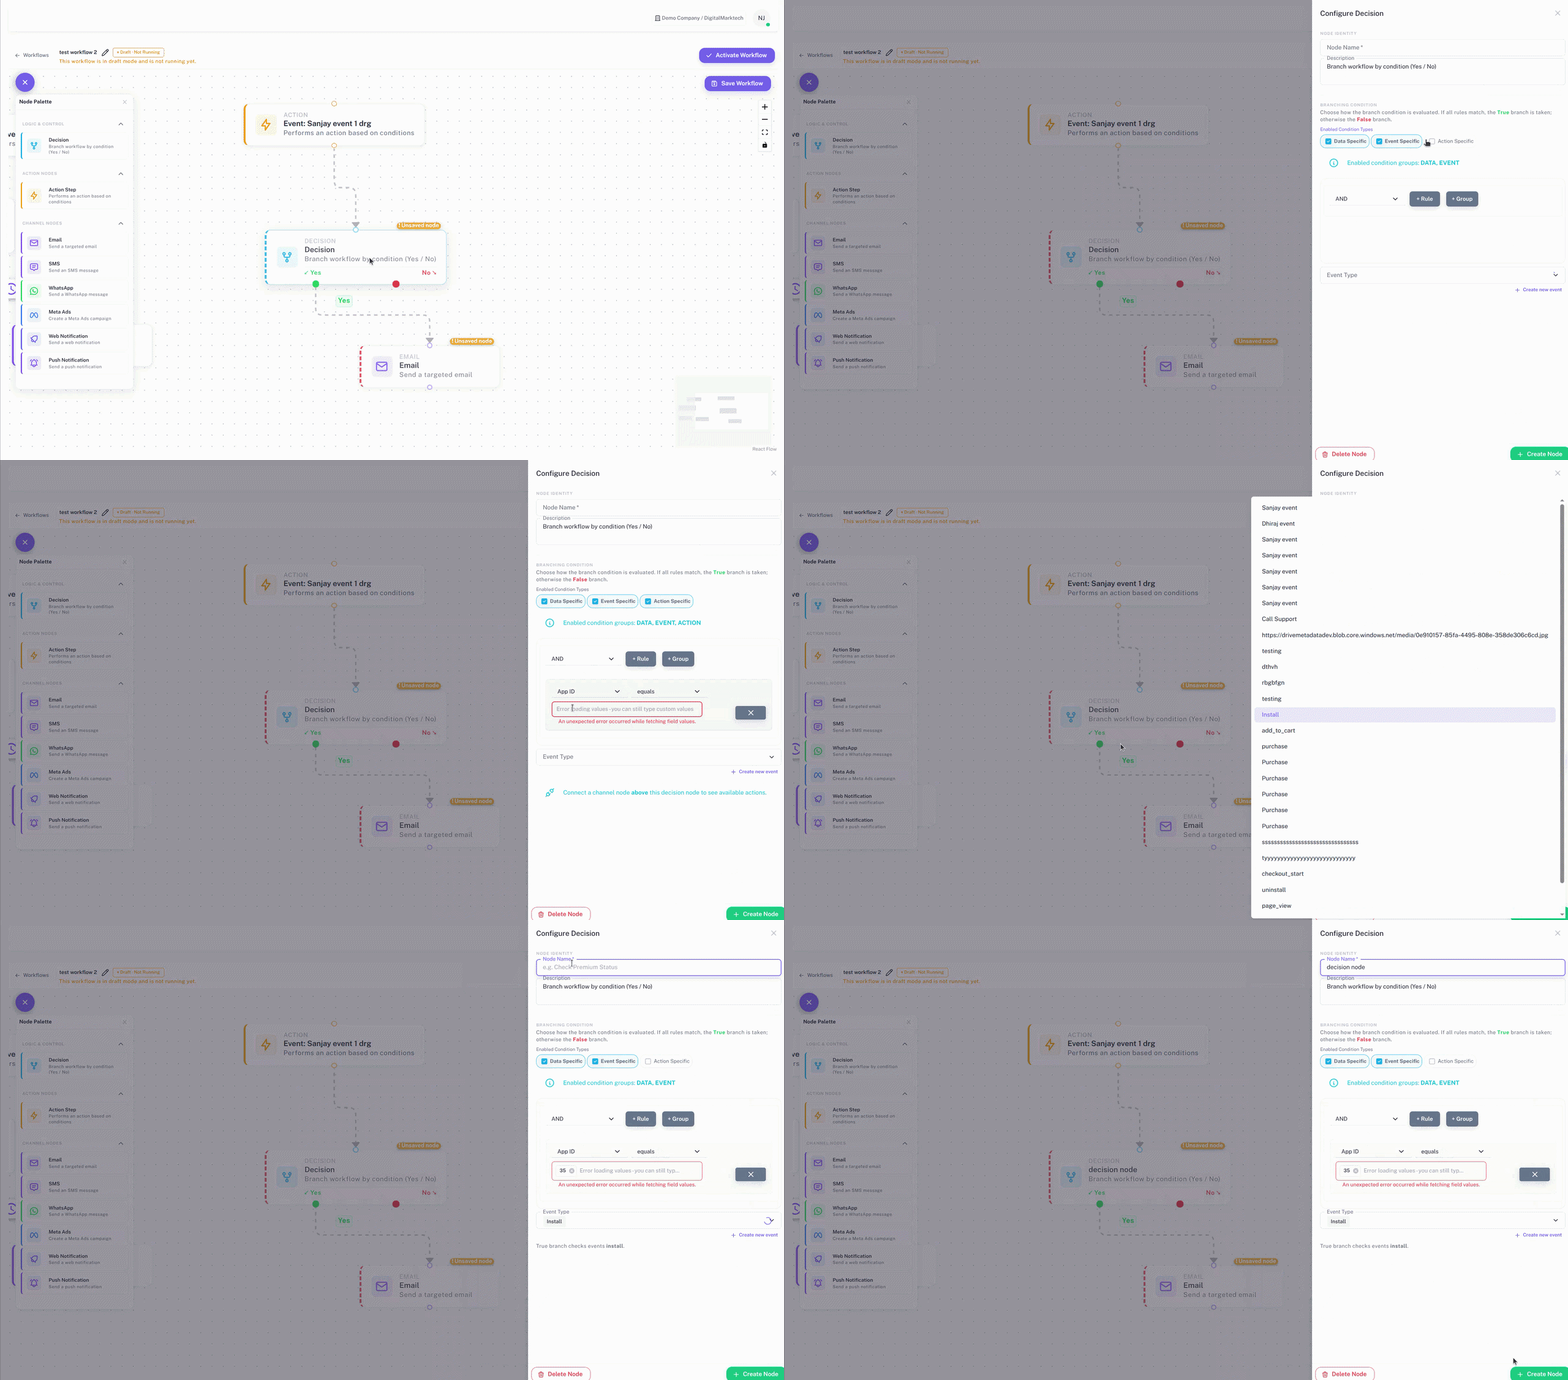
Decision conditions can use data, event, or action-specific logic. When the condition matches, the customer follows the true branch. Otherwise, the customer follows the false branch.
Configure at least one condition before saving the node.
Decision conditions can include:
- Data Specific rules from available customer or event fields.
- Event Specific rules based on selected event types.
- Action Specific rules based on upstream channel behavior.
For Action Specific conditions, connect a channel node above the Decision node first. The available action options depend on the upstream channel.
Configure channel nodes
Use channel nodes to send a message or update a destination.
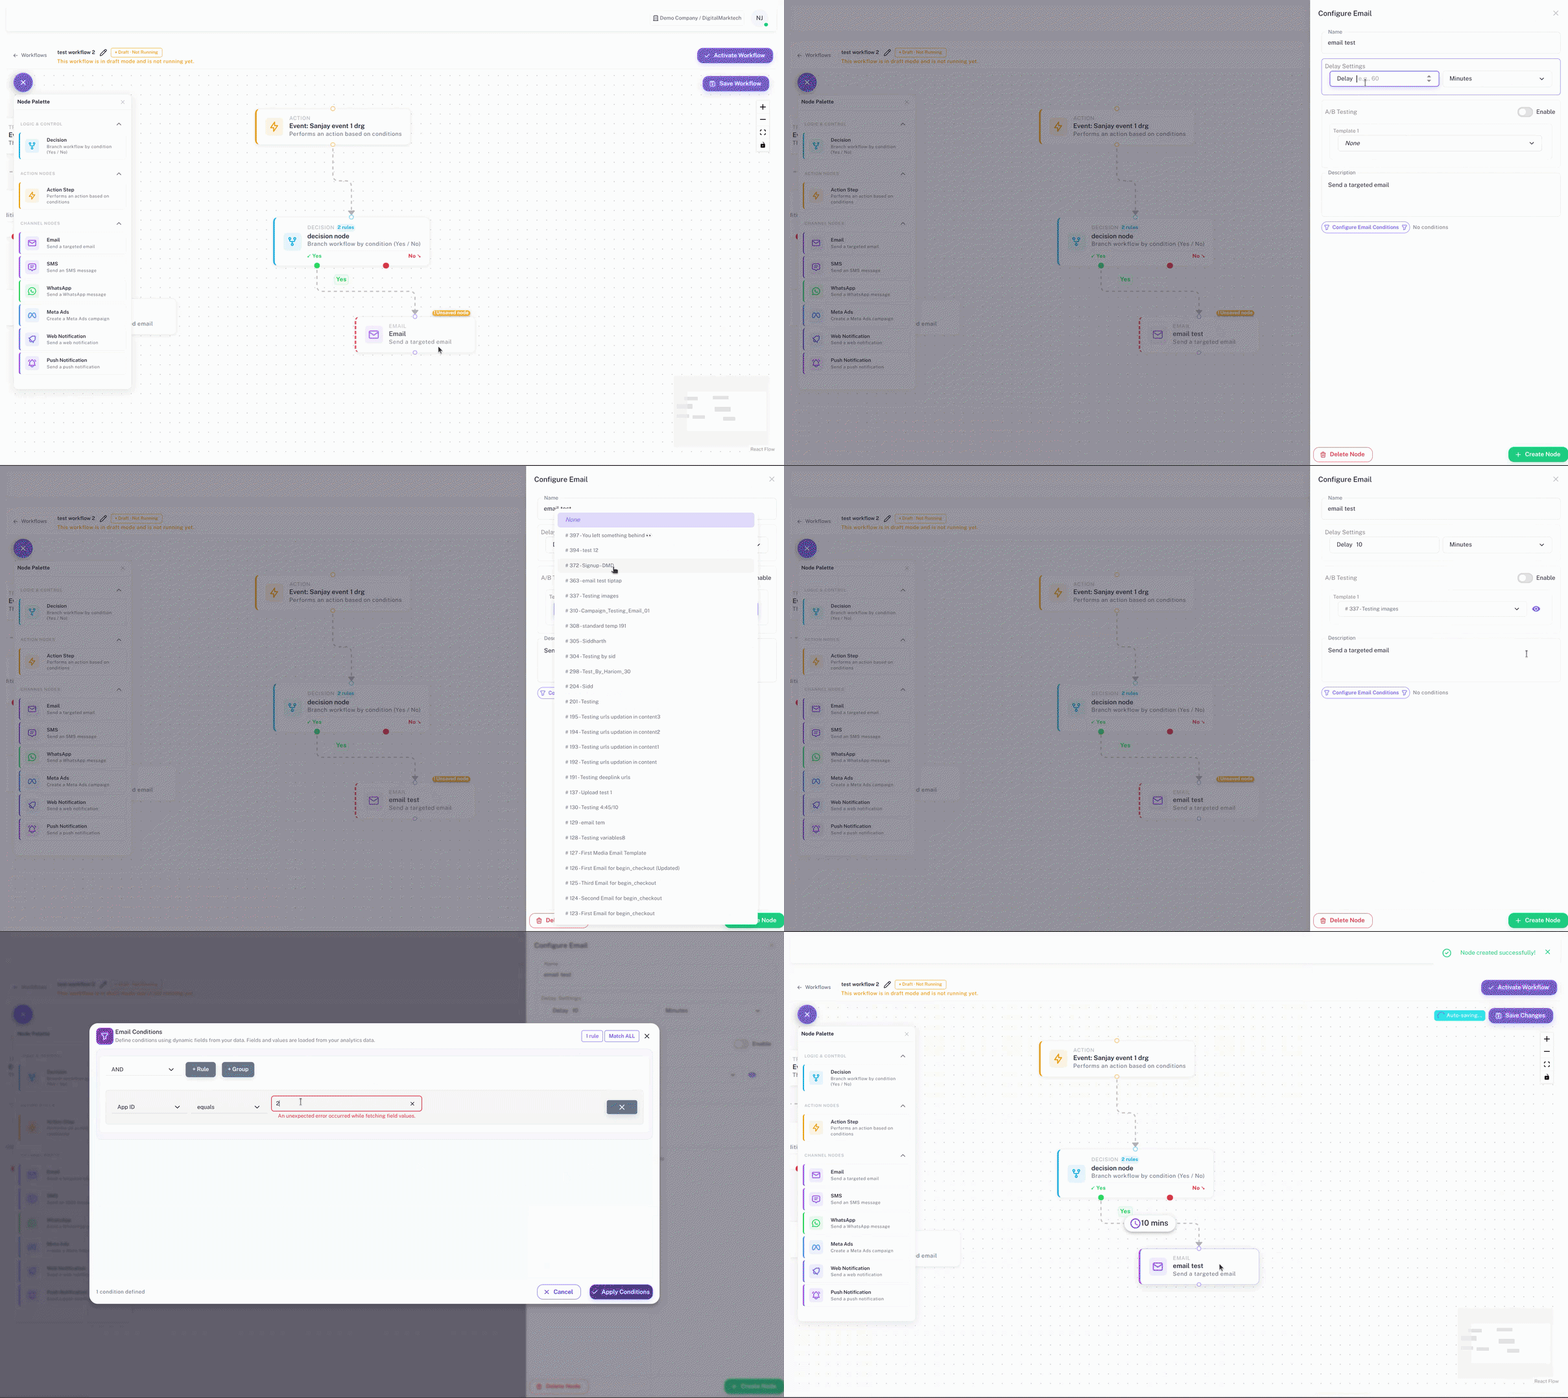
Email, SMS, WhatsApp, Web Notification, and Push Notification nodes require:
- A name.
- Delay Settings.
- At least one template.
- Both Template 1 and Template 2 when A/B Testing is enabled.
- Optional data conditions when the channel should only apply to matching customers.
Meta Ads nodes require:
- A name.
- Delay Settings.
- Select Account.
- Select Audience.
- Optional data conditions when the audience update should only apply to matching customers.
If the selected Meta Ads account has not accepted required terms, use the Accept TOS link shown in the node configuration.
Configure conditions
Use the condition builder when an Action Step, Decision, or channel node should only apply to matching customers.
Condition modals can include:
- Field selection from available workspace data.
- Match logic such as Match ALL or Match ANY.
- Value selection or typed custom values.
Select Apply Conditions before closing the modal. Select Cancel to discard modal changes.
Connect and save nodes
Connection order matters.
Use these rules while building:
- Channel nodes must connect to a saved Action Step ancestor before they can be created.
- A channel node can only have one incoming connection.
- An Action Step can only have one incoming connection.
- A Decision node can accept multiple incoming connections.
- Each Decision branch handle can only be connected once.
- Decision branch labels default to Yes and No.
New dragged nodes may show as unsaved until Create Node succeeds. Open the node settings, complete required fields, and select Create Node.
Autosave runs after structural changes such as adding, moving, connecting, deleting, or successfully creating, updating, or deleting nodes. Node form edits are not complete until you select Create Node or Update Node.
Review a workflow
Use the workflow view page when you want to review the journey without using the editor controls.
The workflow view page shows:
- The workflow name.
- The workflow status.
- Edit Workflow.
- Delete.
- Final Submit.
- The workflow canvas in view mode.
Select Edit Workflow to return to the editor. Select Delete only when the workflow should be permanently removed.
The delete dialog requires exact confirmation text in this format:
Delete {workflowName}
Activate or final submit
Use Activate Workflow in the editor or Final Submit from the workflow view page when the workflow is ready. DriveMetaData submits the workflow to the backend for final processing. The workflow status updates when the server accepts the submission.
Before activation, check:
- The trigger event matches the journey goal.
- Every channel node is connected to the correct saved Action Step path.
- Decision branches match the intended customer experience.
- Channel templates are approved.
- Delay settings are correct.
- Consent, suppression, and exit rules are reviewed.
- Analytics and success metrics are defined.
Activation can affect live customer journeys. Do not activate a workflow until required templates, consent rules, suppression rules, branch logic, and measurement checks are complete.
QA checklist
Before activation, confirm:
- Workflow name and description explain the purpose.
- App stream is correct.
- Trigger event is available and uses the expected event name.
- No node still shows as unsaved.
- Every channel node has a saved Action Step ancestor.
- Templates are selected for every non-Meta channel node.
- A/B tests have both required templates.
- Delay settings are present for channel nodes.
- Decision nodes have at least one condition.
- Exit events are configured where the journey should stop after conversion or opt-out.
- Meta Ads nodes have the correct account and audience.
- The expected owner has reviewed the workflow.
Common issues
| Issue | Cause | Fix |
|---|---|---|
| Workflow cannot be created | Workflow name or App stream is missing | Enter a name and select an App stream |
| Search results feel delayed | Search waits briefly before refreshing results | Wait for the list to refresh after typing |
| Analytics columns are unavailable | Authentication, workspace, selected measure, or analytics data is missing | Check workspace context, date range, selected measures, and use Retry Analytics when shown |
| A node shows as unsaved | The node exists on the canvas but has not been created in the backend | Open the node settings and select Create Node after completing required fields |
| Channel node cannot be created | The node is not connected to a saved Action Step ancestor | Create or update the Action Step first, then connect the channel node |
| Channel node requires templates | Email, SMS, WhatsApp, Web Notification, and Push Notification nodes require at least one template | Select a template before creating or updating the node |
| A/B test cannot be saved | One of the required template fields is missing | Select both Template 1 and Template 2 |
| Decision node cannot be saved | No decision condition is configured | Add at least one data, event, or action-specific condition |
| Conditions do not apply | The condition modal was closed without applying changes | Select Apply Conditions before saving the node |
| Status switch is not available | Draft workflows do not show the Active or Inactive switch | Use Activate Workflow or Final Submit when the workflow is ready for backend validation |
| Delete Workflow is disabled | The confirmation text does not match the required phrase | Type Delete {workflowName} exactly as shown in the dialog |
| Activation fails | Backend validation rejected the workflow | Review the snackbar error, unsaved nodes, templates, delays, decision conditions, and connections |
Suggested screenshots to add later
Add screenshots when the image files are available:
- Workflow list with grid and list controls.
- Workflow list with analytics columns and Customize Columns open.
- Create New Workflow dialog.
- Workflow editor canvas with Node Palette open.
- Node configuration drawer for an Action Step.
- Node configuration drawer for a channel node.
- Decision node with Yes and No branches.
- Workflow view page with Final Submit.